GitHub Integration
This document will outline both the GitHub setup process as well as the MikroCloud setup process in order to get you on your feet quickly.
GitHub OAuth 2 Setup
Step 1: Log into your GitHub Profile
- Log into your GitHub Profile, and then navigate to the following url:
https://github.com/settings/developers - You will see the following page, or a page similar to the one shown below.

Step 2: Create the new OAuth Application
- On the OAuth creation page, click on the
New OAuth Appbutton, this will start the configuration for the GitHub setup.

- You will be taken to a new page, which will allow you fill out some information and set up the application.
| Setting | Description |
|---|---|
| Application Name | Give your application a name, this will be shown to your users when they authenticate with the portal. |
| Homepage URL | This will be the full URL to your application's URL. (In our example we have put the full URL for MikroCloud's home page.). |
| Application description | This is a short description that will be shown to all users of your application. |
| Authorization callback URL | This is MikroCloud's callback URL, which is the following: https://captive.mkcld.io/callback |
| Enable Device Flow | You can enable this option by ticking the tickbox, this will allow the OAuth app to authorize users via the GitHub Device Flow. |

- When you have entered all of the information needed, you can then continue by clicking on the
Register applicationbutton at the bottom of this page.
Step 3: Configure the GitHub OAuth application
- Once you have clicked on the
Register applicationbutton in the previous step, you will then be taken to a new GitHub page showing a bit more information.

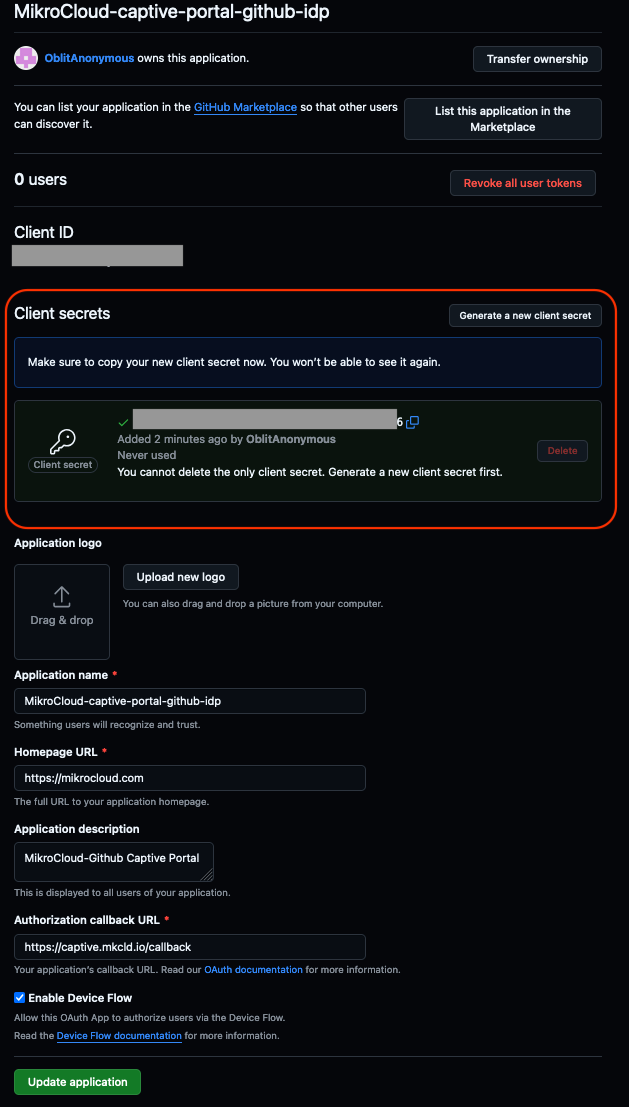
Take not of the Client ID, and save the code somewhere safe, you will need it for later.
- Within the Client secrets section, to the right, you will see a button labeled
Generate a new client secret; you can click on that button in order to create a new client secret. - After clicking on the
Generate a new client secretbutton, you will be asked to authenticate with GitHub using MFA or other methods in order to create the new client secret. - When you have successfully authenticated, you will then be taken back to the previous page which showed the application details.

Note the new client secret which is shown in plaintext down and save it somewhere, you will not be able to see it again.
- After you have saved your client secret somewhere, you can then proceed to click on the small
Update applicationbutton at the bottom of this page. This will apply all outstanding settings.
You have successfully set up the GitHub side of this IDP integration, we can now move on to the MikroCloud setup.
MikroCloud IDP Setup
Once you have set up the GitHub side of the Identity provider, you can now continue to set up the MikroCloud side of this integration, follow along with the steps below.
Step 1: Navigate to your Identity Providers
- From your MikroCloud
Dashboard, navigate toSettings -> Identity Providers, this will take you to the Overview page for the Identity Providers setting.

- Once you are on the
Identity Providers Overviewpage, you can click on the `Get Started button at the top of the page.

Step 2: Create your IDP Integration
- Once you have clicked on the
Get Startedbutton, a new widget will pop up which will allow you to configure your IDP settings.

- Fill out the following information into your configuration widget.
| Option | Description |
|---|---|
| Name | Give your Integration a descriptive and unique name. |
| Identity Provider | Using the dropdown menu, select GitHub as the IDP. |
| Client ID | Paste your previously saved Client ID into this textbox. |
| Client Secret | Paste your previously saved Client Secret into this textbox. |

- Once you have filled in all of the required information, you can then continue by clicking on the
Savebutton at the bottom of this page. - Give the system a few moments to initialize and create the IDP integration.
You have successfully set up the GitHub integration, you can now continue by creating a Captive Portal Instance to use with your integration.
Was this page helpful?